# How to Serve Your Trash to the Public Domain
Build Your Own Recycle Bin!
#### Table of Contents
1. [Introduction](#introduction)
- [Goals](#goals)
- [Background](#background)
- [Document Overview](#document-overview)
- [Requirements](#requirements)
2. [Deleting Consciously](#deleting-consciously)
- [Making the Recycle Bin](#making-the-recycle-bin)
- [Making the "Move to Recycle Bin" Quick Action](#making-the-move-to-recycle-bin-quick-action)
- [User-Unfriendly Design](#user-unfriendly-design)
3. [Peer-to-Peer Networking](#peer-to-peer-networking)
- [Serving Your Recycle Bin to the Public Domain](#serving-your-recycle-bin-to-the-public-domain)
- [Becoming a Good Server](#becoming-a-good-server)
- [Importing Your Friends' Recycle Bins](#importing-your-friends-recycle-bins)
4. [Take These Files](#take-these-files)
- [The DAT Software Development Kit](#the-dat-software-development-kit)
- [The Third Party Server](#the-third-party-server)
- [Back-End Design](#back-end-design)
5. [Conclusion](#conclusion)
- [Credits](#credits)
- [Theoretical Footing](#theoretical-footing)
- [Author](#author)
- [License](#license)
## Introduction
<!-- <em>Files want to replicate. Files want to travel. Files want to remain in flight.</em> -->
<img src="src/icon.png" width="250">
### Goals
1. Creating a Recycle Bin and enabling it to collect unwanted files.
2. Serving the Recycle Bin to the Internet by means of a peer-to-peer protocol.
3. Setting up a third-party server to pull the Recycle Bin into a browser-accessible website.
### Background
<!-- **A definition: a server is a role that a ccomputer takes in a network.** -->
<!-- The last twenty years of the Internet have played out in such a way that too few people built servers that were very "good" and too many people wanted to use those servers to make their lives "better". We are now in a place where this model has scaled disproportionally:
1. Software is distributed canonically from very few servers.
2. Information about how every element of our existence depends on this software is aggregated in those servers.
This is a consensus that we actively choose to live in and we are facing a plausible future where there is a ridiculous imbalance in power between those building servers and those using them. We need to re-evaluate on what terms we connect. -->
A personal computer comes pre-installed with a web-browser, a tool dedicated to the consumption of parts of the Internet, a "Downloads" folder, a folder dedicated to the storage of downloaded files for extended use, and a "Bin", a folder dedicated to the temporary storage of files before permanent deletion. In this way, a personal computer sits at the recieving end of the flow of information, software, and culture.

Our interaction with our personal computers defines the kind and extent of our engagement with the Internet. Like this, we can see the end-user as a by-product of their pre-designed personal computing experiences, and as we have it today, we are all clients by design.
<!-- Although they are beautiful, smooth and seamless objects, let us start by looking at our personal computers as being broken. -->
However, in the spirit of peer-to-peer networking initiatives, all clients can also be servers, all that is downloaded can also be uploaded, all data can and should replicate across several devices, and when a file is no longer deemed valuable on one device, it can find value on the next device.
In this tutorial, we will reconfigure our personal computing experience by revisiting the act of deleting files. We will be creating a Recycle Bin to accompany our Bin, scripting our computers to behave as servers and scripting ourselves to unlearn our behaviour as clients. Deleting can be a networked, shared, and circular act, so we will also learn how to create a peer-to-peer network of Recycle Bins to ensure that our deleted files find a second life and remain in flight.

### Document Overview
As it stands today, this document is a set of instructions on serving one's trash to the public domain; whereas, in fact, it is a documentation of my own process up to this point in time. Every step in this process is activated into the second-person future imperative tense (ie. "At first I did this and then I did that" → "First, do this and then do that").
This document by no means intends to propose a single way forward. There are countless ways to serve your trash to the Internet and this is the way I chose to do it.
The first part of this document provides instructions on creating a Recycle Bin folder and introduces the reader to user-side scripting on MacOS with bash, AppleScript and Automator. The second part of this document introduces the Hypercore Protocol, describes the required steps to serve and import Recycle Bins and sheds light on the responsibilities that come with becoming a server. The last part of this document is optional; it provides instructions on setting up a homeserver with a Raspberry Pi and using that as a bridge for a Recycle Bin to reach the "normal" web through "traditional" web-browsers.
### Requirements
In order to follow this tutorial, you must have:
- a computer running MacOS, connected to the Internet
- a traditional Bin folder
- a basic level of comfort with your Terminal and bash scripting
- a Raspberry Pi accessible through a public IP address
- a basic understanding of front-end web development languages (HTML / CSS / JS)
Let's get started!
---
## Deleting Consciously
For obvious reasons, we will not actually serve our "Bin" to the public domain. We will set up an alternative "Recycle Bin" folder that sits right next to the "Bin" and acts similarly. We will also write the (user-unfriendly) scripts that will enable our Recycle Bin to intervene in our day-to-day habit of deleting files.
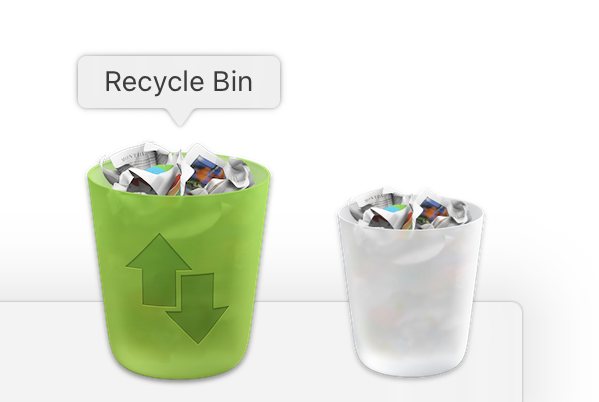
### Making the Recycle Bin
Make a folder anywhere on your computer, somewhere that you will not forget, and name it "Recycle Bin". You can go ahead and drag the folder to the dock for easier access (I have mine right next to the "Bin").
Optionally, you can change its icon to make it a little bit cuter. You can use [this icon](./src/icon.png) if you like. Open it in the "Preview" app, then `CMD + A` to select the entire image and `CMD + C` to copy it. Navigate to your "Recycle Bin" folder and `CMD + I` to get info. There will be a little folder icon on the very top left corner in the pop-up window; click it and `CMD + V` to paste the image you copied. This will update the folder icon everywhere in your file system.
### Making the "Move to Recycle Bin" Quick Action
Next, we will create a Quick Action called "Move to Recycle Bin" that will do exactly what it says. To do this, we will use Automator (pre-installed on most Mac's).
Launch the Automator app, click "New Document", select "Quick Action Workflow" and click the "Choose" button.
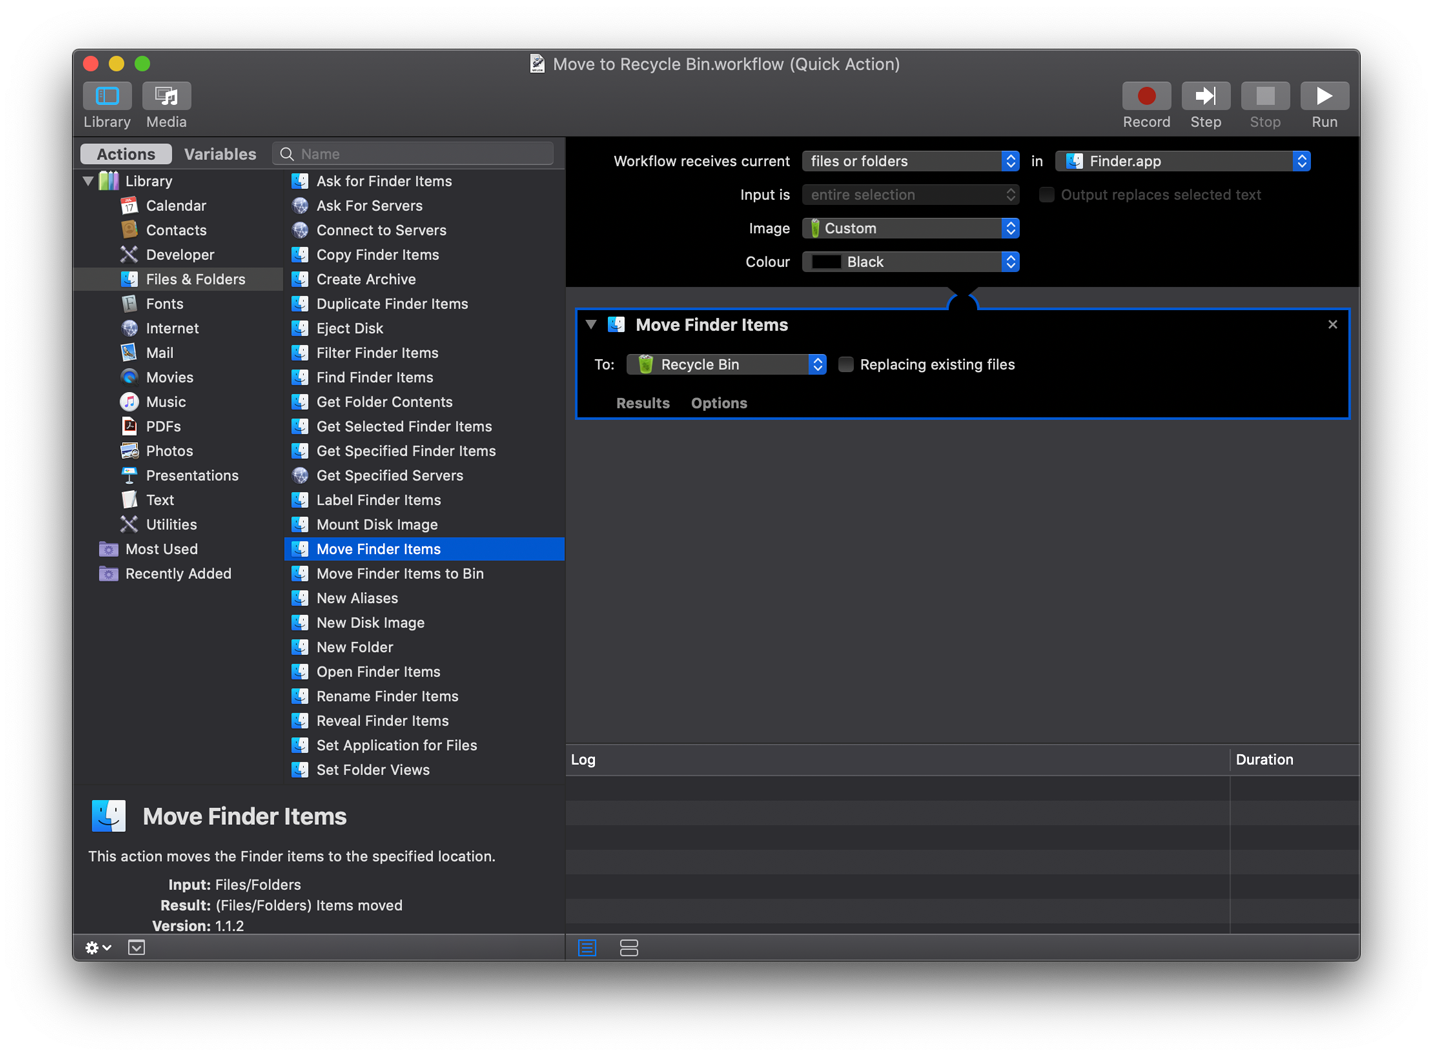
Build a "workflow" where you move selected finder items to the Recycle Bin. Make sure to select your Recycle Bin folder (that you just created). For the quick action image, I have chosen to use the same image as the one I am using as my folder icon.
All done! To install your new quick action on your device, just `CMD + S` and save it as `Move to Recycle Bin.workflow`. It is now ready to use.
Before we use our quick action, lets attach a keyboard shortcut to it. You can do this by going to System Preferences > Keyboard > Shortcuts > Services. Under the section "Files and Folders" you will find the Quick Action you just created. Click on the right, where it says "none", and type in your keyboard shortcut. I chose for `CMD + SHIFT + E`.
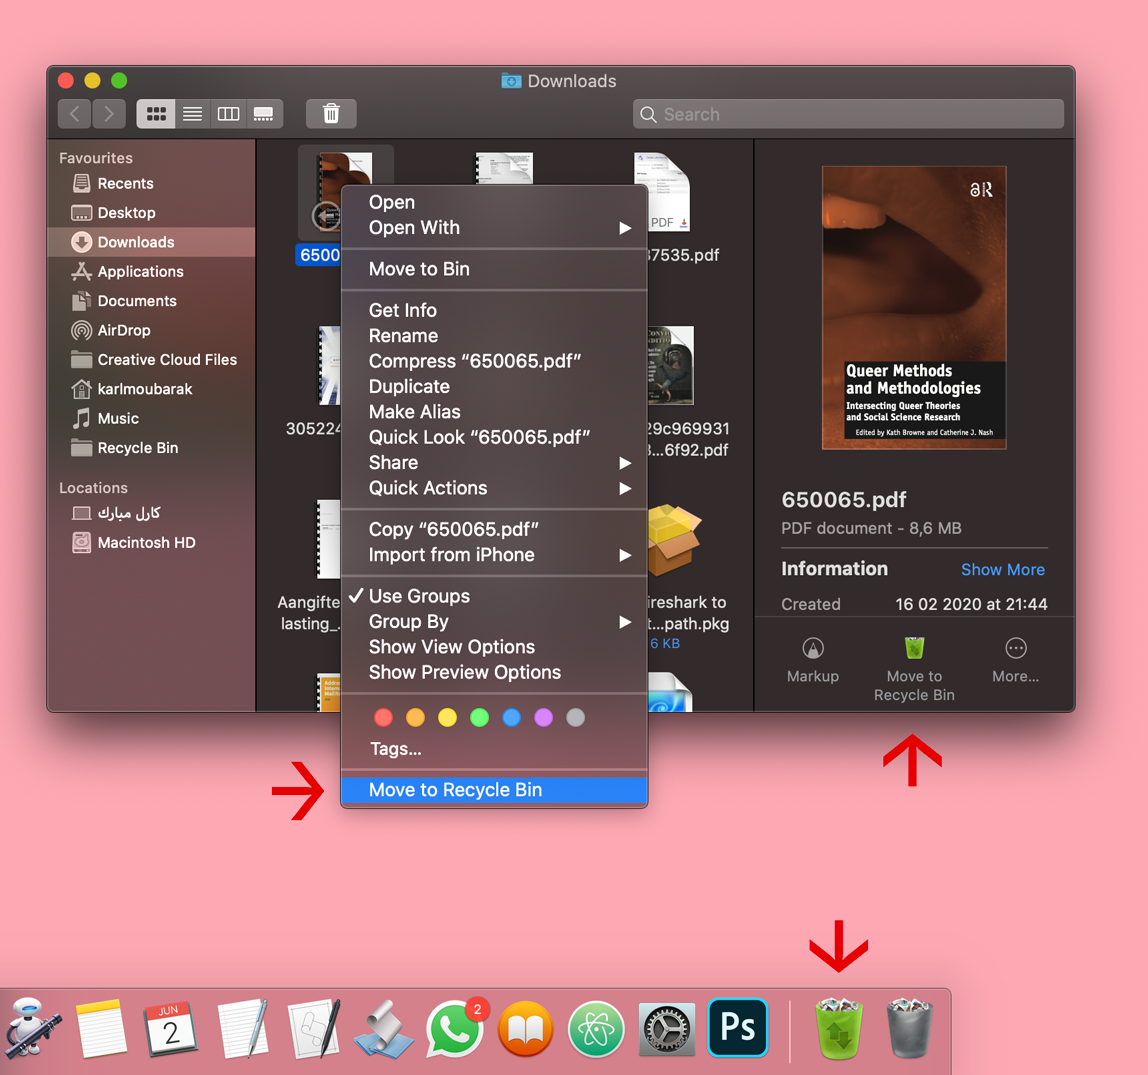
Like this, we created several ways to move files to the Recycle Bin from anywhere in the Finder app:
- Click and drag files to the Recycle Bin folder.
- Click and drag files to the Recycle Bin shortcut on the Dock.
- With files selected, click on the "Move to Recycle Bin" icon in the preview pane, taskbar, and even in the touch bar if you have one.
- Right-click on files and choose "Move to Recycle Bin" from the contextual menu.
- `CMD + SHIFT + E`.
### User-Unfriendly Design
It's great that we have all these options to move files to our Recycle Bin, but we're not done just yet! For me, the last ten years involved my getting very physically used to moving my files to the Bin and as soon as I set up my Recycle Bin, I caught myself often forgetting that I had it. Let's unlearn that behaviour. Now we will automate a few things in such a way that the Recycle Bin will intervene whenever we are moving a file to the Bin.
Open a Terminal window and create a working directory for your scripts anywhere on your file system.
```bash
cd ~
mkdir recycle-bin-scripts
cd recycle-bin-scripts/
```
First, create a small bash script that watches your traditional "Bin" folder for changes. To do this, create a file called `watch-the-bin.sh` and open it in your favorite text editor.
```bash
nano watch-the-bin.sh
```
Then paste the following code into it:
```bash
#!/bin/bash
fswatch ~/.Trash/ -e ".DS_*" -0 --event Renamed | xargs -0 -n 1 -I {} sh -c '
FILE="{}"
if [ -f "$FILE" ]; then
echo $FILE is being moved to bin;
osascript interrupt-the-bin.scpt $FILE;
fi
'
```
The first line makes our script executable and the second line employs the pre-installed `fswatch` program to "watch" our "Bin" folder for changes. The Bin folder is actually a hidden folder in your home directory called `~/.Trash/`. We are using `-e ".DS_*"` to exclude all `.DS_store` files that are automatically created every time a file is moved to the Bin. and `--event Renamed` to only watch files that have _moved_ to and from the Bin folder. This program is resource-efficient and will return the path of every file we move to and out of the Bin without heating up your computer.
The next part uses `xargs` to pass every returned file path into a temporary variable `{}` and into the following function. This function first redefines our variable as `FILE`, then checks if it exists in order to filter out half the changes picked up by `fswatch`, which are files _leaving_ the Bin folder (remember: we are only interested in watching files entering the Bin). Last, we echo that the file has changed and pass it into an AppleScript called `interrupt-the-bin.scpt`.
Save this file (`CTRL + O`) and exit the editor (`CTRL + X`).
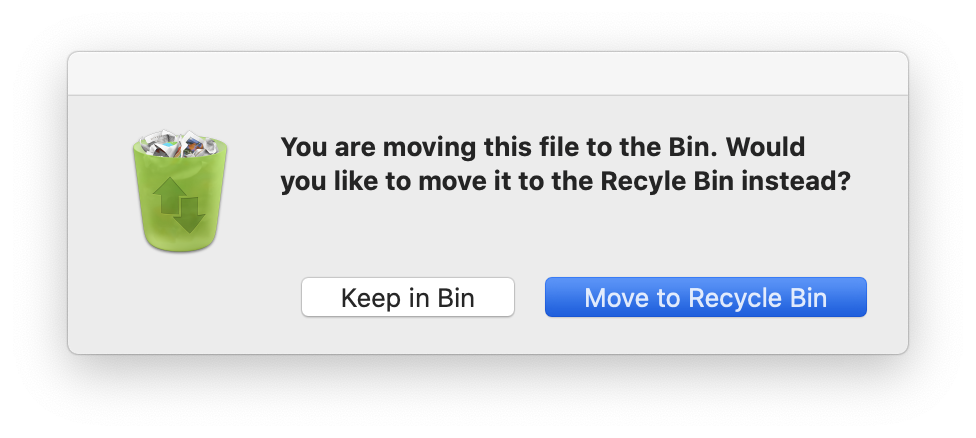
Now, we will write `interrupt-the-bin.scpt`. We need to do this in order to create a dialogue box native to the operating system that interrupts our act of moving a file to the Bin and asks us if we want to move it to the Recycle Bin instead.
Launch Apple's script editor app and paste the following code into it:
```osascript
property dialog_timeout : 30
on run this_file
try
set this_POSIX_file to POSIX file this_file
set RecycleBin to alias "Macintosh HD:Users:karlmoubarak:Desktop:RECYCLEBIN:Recycle Bin:"
-- Change the above line to reference the path of your own Recycle Bin.
set alert_message to "You are moving this file to the Bin. Would you like to move it to the Recycle Bin instead?"
display dialog the alert_message with icon caution with title "Attention" buttons {"Keep in Bin", "Move to Recycle Bin"} default button 2 giving up after dialog_timeout
set the user_choice to the button returned of the result
if user_choice is "Move to Recycle Bin" then
tell application "Finder"
move this_POSIX_file to RecycleBin
end tell
end if
end try
end run
```
The first line sets a timeout of 30 seconds for our dialogue box. Next, we pass our variable `$FILE`, which contains the path of the file moved to the Bin, into our script as `this_file` and convert it into Apple's path-naming syntax. We alias `RecycleBin` with the path to the Recycle Bin folder on our file system. _Change this line to reference the path of your own Recycle Bin_. We create an alert message and then make a dialogue box with `display dialog argument1 argument 2 ...`.
The arguments we pass into the dialogue box are, respectively, the alert message we wrote, the Recycle Bin icon to display with it, a title of "Attention" and two buttons: "Keep in Bin" and "Move to Recycle Bin". The default button that will be highlighted and clicked after you don't respond for 30 seconds is the second one. If you click on the second button, this last part of the script will move your file to the Recycle Bin.
Save this script in the same directory you created `watch-the-bin.sh`. This is important because the latter calls the former every time a file is moved to the Bin, and it needs to reference it easily.
**Important:** You need to give the Terminal app "Full Disk Access" permissions from your System Preferences in order for this to work. This is because you are running scripts that programmatically move files between different folders. This is not enabled by default.
Last, in your terminal type:
```bash
sh watch-the-bin.sh
```
Now, if you move a file into your Bin by dragging it there, right-clicking and choosing "Move to Bin", clicking on the taskbar shortcut or using the default `CMD + ⌫` keyboard shortcut, first, the file's path is printed in the console and then, the AppleScript you wrote runs and a dialogue box will appear asking you whether you want to keep the file in the Bin or move it to the Recycle Bin. Choosing the latter will do what it says.
---
## Peer-to-Peer Networking
In this section, we will install a server in our Recycle Bin. We will be using [Hypercore](https://hypercore-protocol.org/), a peer-to-peer protocol that enables you to share any folder on your device directly with another device using a key that looks like this: `hyper://...`. To do this, we will make use of the [Hyperdrive-Daemon](https://github.com/hypercore-protocol/hyperdrive-daemon), a command-line tool to manage Hyperdrives (when a folder is served to the Internet using Hypercore, it is referred to as a Hyperdrive).
From the `hyperdrive-daemon` documentation: "The Hyperdrive daemon helps you create, share, and manage Hyperdrives through a persistent process running on your computer, without having to deal with storage management or networking configuration."
### Serving Your Recycle Bin to the Public Domain
First, check that you have `npm` and `node` installed. Open a terminal on your computer and type:
```bash
npm -v
node -v # should be version 12 or above
```
Then, install the `hyperdrive-daemon`:
```bash
npm i hyperdrive-daemon -g
```
When installation is complete, start the daemon:
```bash
hyperdrive start
```
With the daemon running, you can check it's status with
```bash
hyperdrive status
```
This will print a bunch of useful version and network information like this:
```bash
The Hyperdrive daemon is running:
API Version: 0
Daemon Version: 1.7.15
Client Version: 1.7.6
Schema Version: 1.6.5
Hyperdrive Version: 10.8.15
Fuse Native Version: 2.2.1
Hyperdrive Fuse Version: 1.2.14
Holepunchable: true
Remote Address: 194.62.216.174:35883
Uptime: 0 Days 1 Hours 6 Minutes 2 Seconds
```
From this output, you are mainly interested in the holepunchability status of your network. Hypercore uses a network address traversal technique called "[hole-punching](https://en.wikipedia.org/wiki/UDP_hole_punching)". If your hole-punchability status is false, this means that connections with peers is less likely. This is nothing to do with you, your computer or your wifi router. This is a characteristic specific to different networks in different locations.
With the daemon running, open a terminal window, navigate to your Recycle Bin folder and initiate a server in it:
```bash
cd /path/to/your/Recycle \Bin/
hyperdrive import .
```
You will be returned a `hyper://...` key. It's an automatically-generated unique public key that points anyone on the Internet to your Recycle Bin. It works much like a traditional URL. Anyone with this key will be able to view and download the contents of your Recycle Bin over the Internet. However, only you can add, remove and change these contents.
Your Recycle Bin is now online. Remember to start the daemon when you restart your computer.
### Becoming a Good Server
Before moving on to the next part, it's important to note that although you are successfully serving your trash to the public domain, it doesn't mean you are good server just yet. Being a good server comes with great responsibility. We will cover the two most important points here.
#### 1. Describe what you are serving.
Your recycled files will be served to the public domain through the Internet. That means everyone with your public key can download your trash. It’s important, when addressing the public domain, to provide context to the content you are serving and communicate the purpose for doing so.
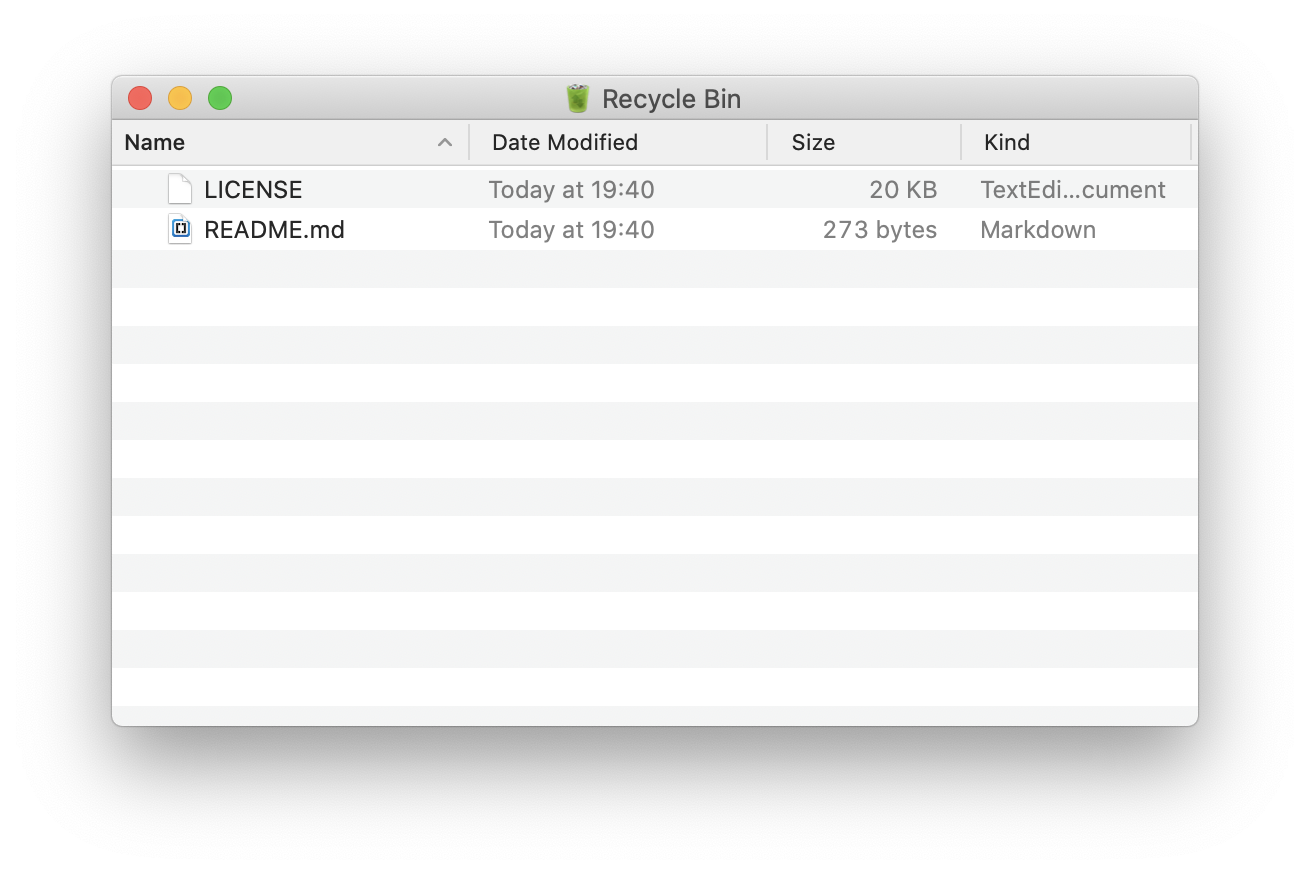
By convention, most servers will include a `README` file in their root directory. The format is not important, as long as the file communicates context and purpose.
First, navigate to your Recycle Bin in your Terminal and create a `README.md` file:
```bash
cd /path/to/your/Recycle \Bin/
nano README.md
```
You can choose to use this basic template that I wrote, but you are free to write to this file whatever you think is important.
```md
Welcome to my Recycle Bin.
This folder is being served from my personal computer. When I move my files here, you can access them unconditionally as long as my computer is on and connected to the Internet.
Take these files. Change these files. Keep these files in flight.
```
#### 2. License your files.
It's also important, when addressing the public domain, to inform your client what they are allowed to do with your files. By convention, most servers use a `LICENSE` file that is placed in the root directory, alongside the `README` file.
Choosing a license is not easy. Deciding what someone else can do with your trash, how and when has proven to be a complicated task for many servers in the past. Moreover, if you do not specify a license, your files are automatically copyrighted, which means that you, the author, own them, and no one can re-use or appropriate them without your explicit permission.
This is the way the world works right now.
The Recycle Bin Project believes in the shared commons and has strong footing in the [Open Source](https://opensource.org/) ethos. If you are interested in a brief break-down of open-source licenses, [https://choosealicense.com/](https://choosealicense.com/) has a great overview.
This document and its containing website make use of the [Creative Commons Attribution Share Alike 4.0 International](/LICENSE) license. This means that anyone is allowed to copy, appropriate and even profit from the project's physical, conceptual and intellectual material, but they are required to republish it under the same license. This seems a bit redundant, but it also means that no one can ever own the project as intellectual property, not even me. The Recycle Bin Project stays in the public domain.
I strongly recommend using this license for your Recycle Bin.
These are the two main files that define a responsible server. If you believe that they are not necessary, feel free to move them to your Bin.
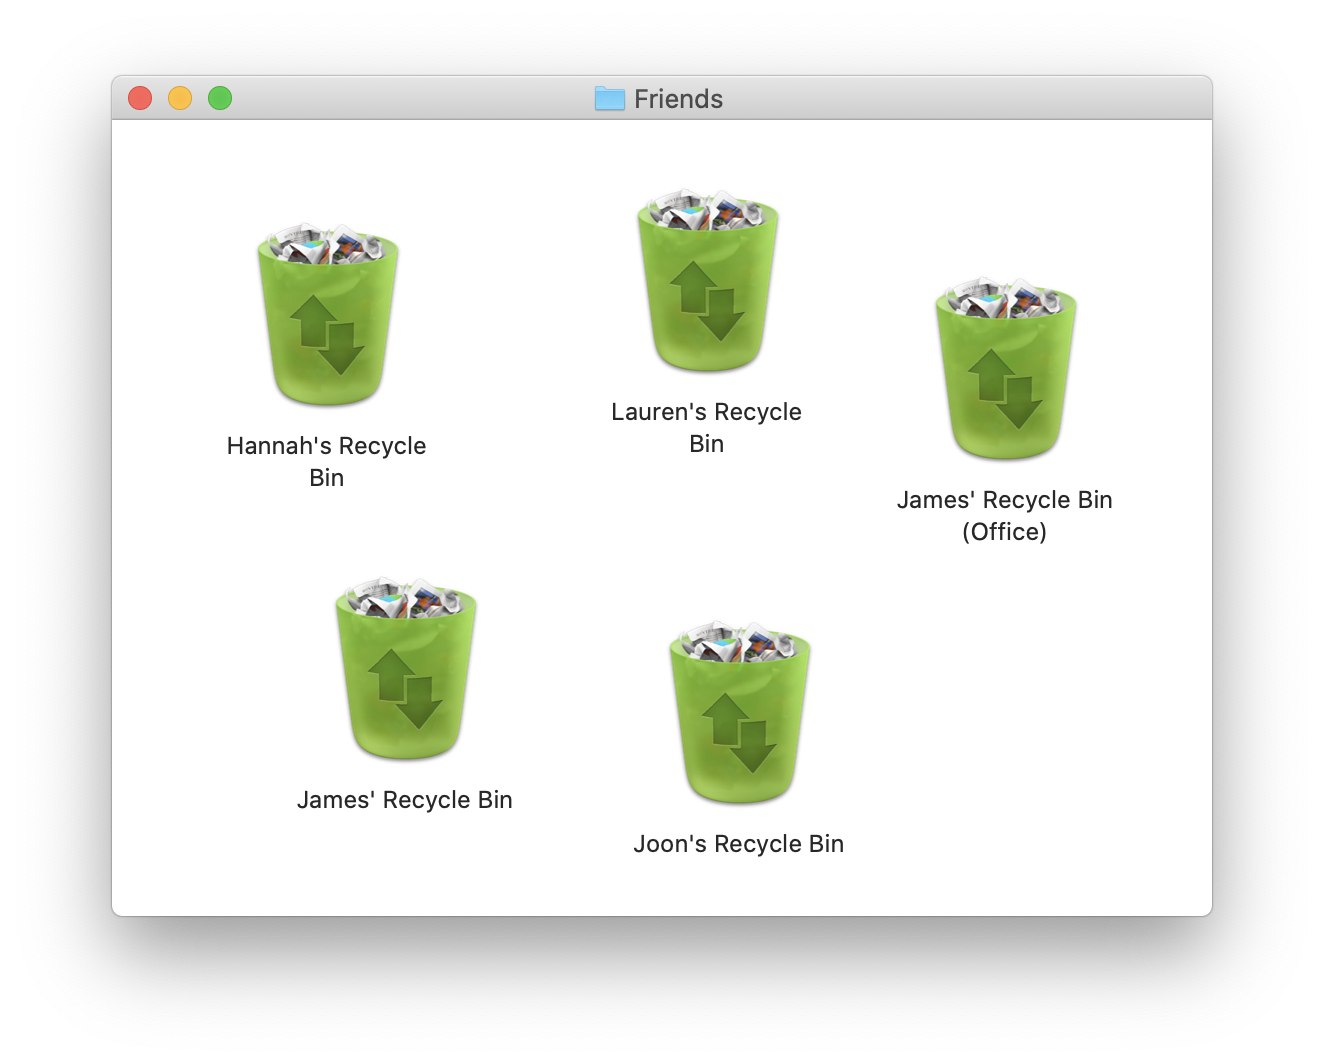
### Importing Your Friends' Recycle Bins
If you have friends and they have Recycle Bins, you can choose to import them and browse through their trash.
For each of your socially-conscious friends:
First create a folder for your friend's Recycle Bin and change its icon to the same icon as yours. Then in your terminal type in:
```bash
hyperdrive export aae4f36bd0b1a7a8bf68aa0bdd0b93997fd8ff053f4a3e816cb629210aa17737 /path/to/your/friends\ Recycle\ Bin/
# replace this key with your friend's Recycle Bin's key.
```
By importing a friend's Recycle Bin, you are also _seeding_ their files. If they go offline but you remain online, the next person that tries to import their Recycle Bin will do so from your computer. This works almost exactly like BitTorrent.
**Note:** The `hyperdrive-daemon` is very new and very buggy. Its authors are working hard to fix the issues that are coming up, so do not worry if something doesn't work; it's not your fault. You can find more information and documentation of common issues on the [Github Repository](https://github.com/hypercore-protocol/hyperdrive-daemon).
---
## Take These Files
Normal web-browsers will not read the contents of your Recycle Bin.
<img src="src/sad-emoji.png" width="250">
Web-browsers are fully capable of dealing with peer-to-peer networks but actively choose not to for reasons related to copyrighting, ownership, privacy, etc... However, web-browsers do understand Javascript and with a little bit of JS magic, we can make this possible.
In this section, we will cover the necessary steps to pull the contents of your Recycle Bin into a normal website, hosted by a normal server. We will make use of the Dat Software Development Kit to make the Recycle Bin accessible to the (much wider) public domain.
This is purely for the sake of addressing a larger audience and having fun doing so. **You are already serving your trash to the public domain successfully. This section is optional.**
As described in the previous sections, we are using Hypercore, a peer-to-peer protocol. This enables us to have a server _inside our Recycle Bin folder_, update it _live_ and _distribute bandwidth_ among all peers. But for this to work in a traditional (non-Beaker) browser, we will use the Dat Software Development Kit.
### The DAT Software Development Kit
The [Dat Software Development Kit](https://github.com/datproject/sdk) is a library of functions that enable the Hypercore Protocol to be integrated in any context that can run Javascript. This means that everything that can be done with the `hyperdrive-daemon` on the command line can also be done in a normal web browser.
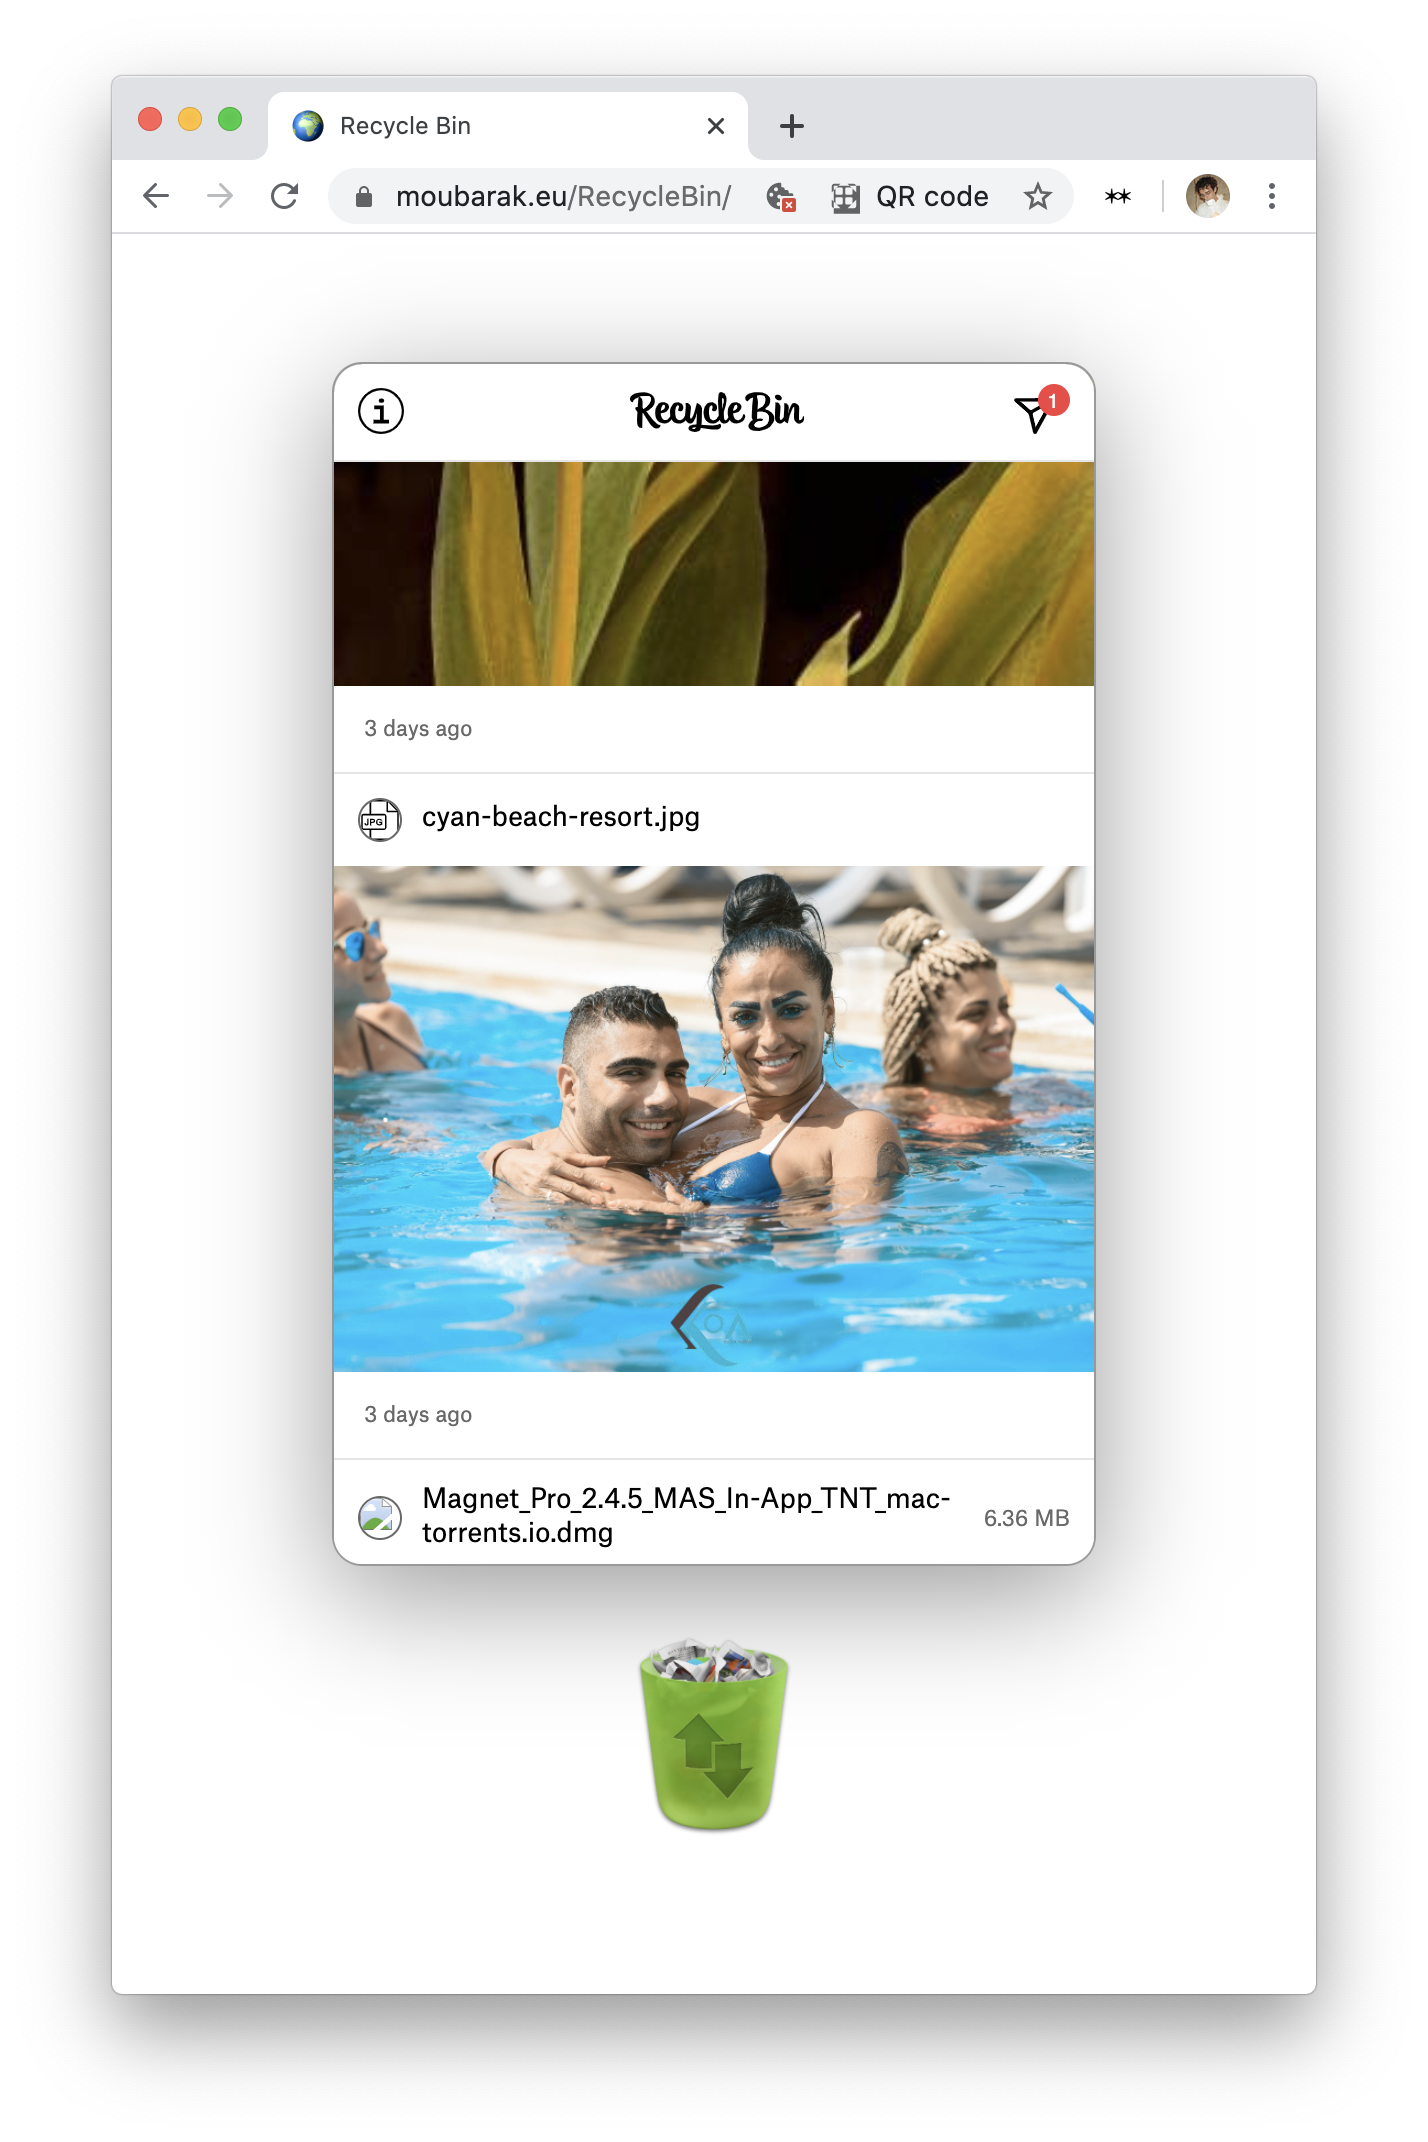
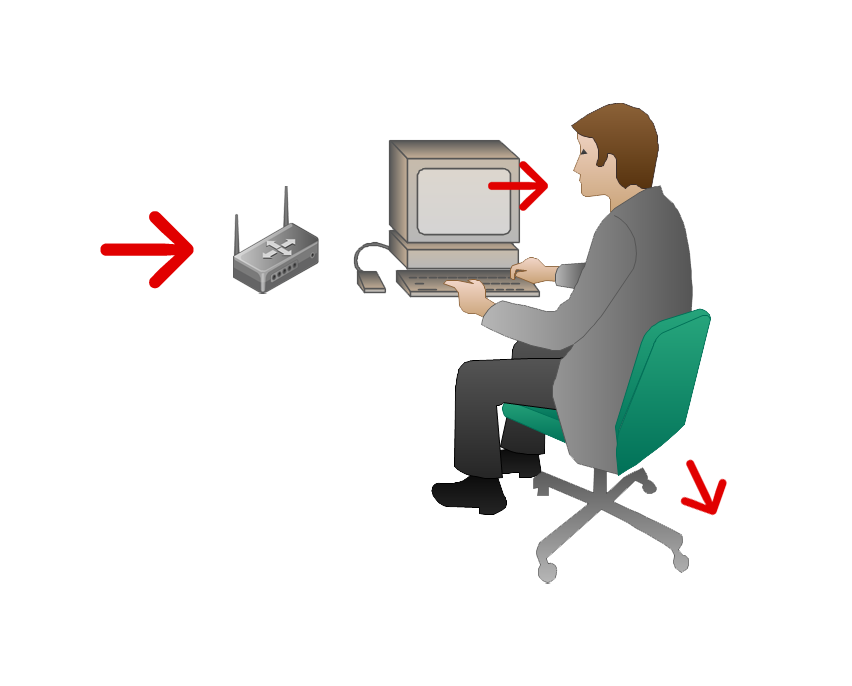
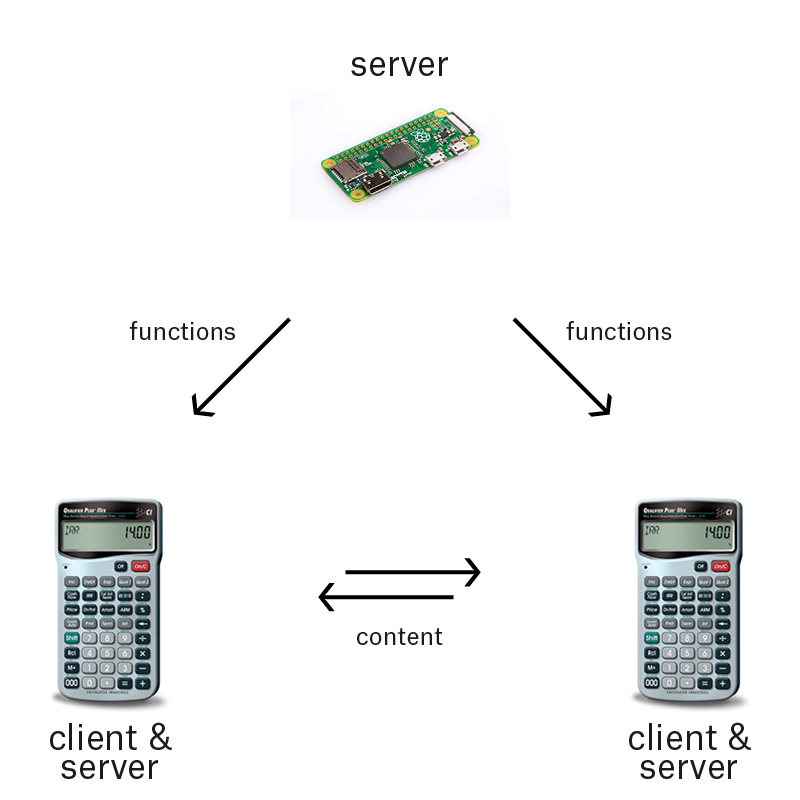
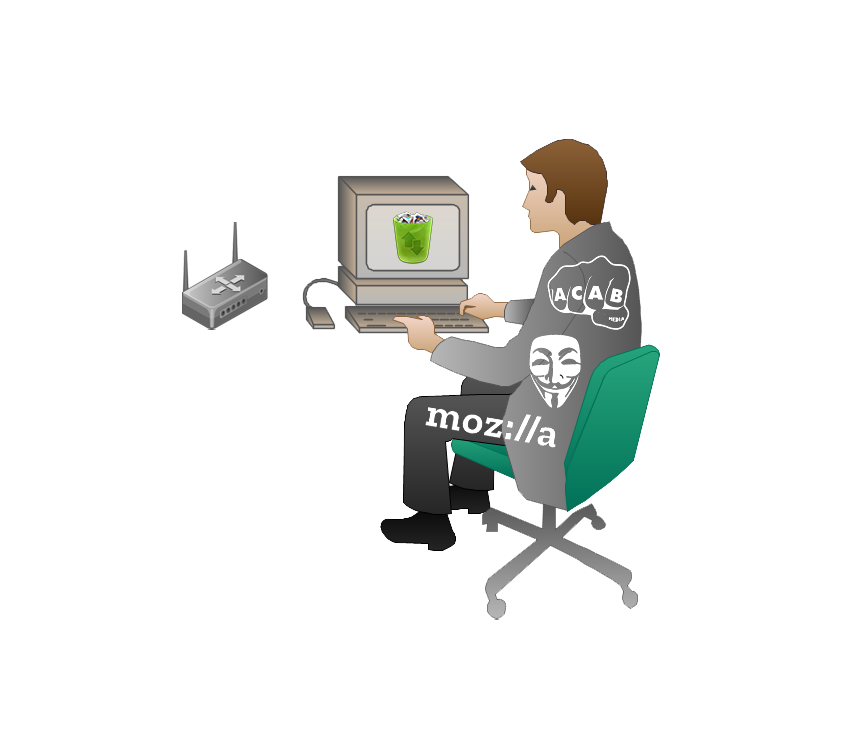
In the above image, my personal computer is serving my Recycle Bin with Hypercore and another computer is viewing my Recycle Bin in their web browser. This can happen because there is a third computer, in my case, "moubarak.eu", acting as a middle-man between both devices. It knows the key of my Recycle Bin, but does not clone its files. It provides the "client" device with the tools (the Dat-SDK) to read that key. Again, this server does not serve my recycled files, but will act as a mediator, serving only the functions that enable other devices to act as both clients and servers, in the context of default web browsers.
 | |
:------------------:|:-----------------:|:----------------------:
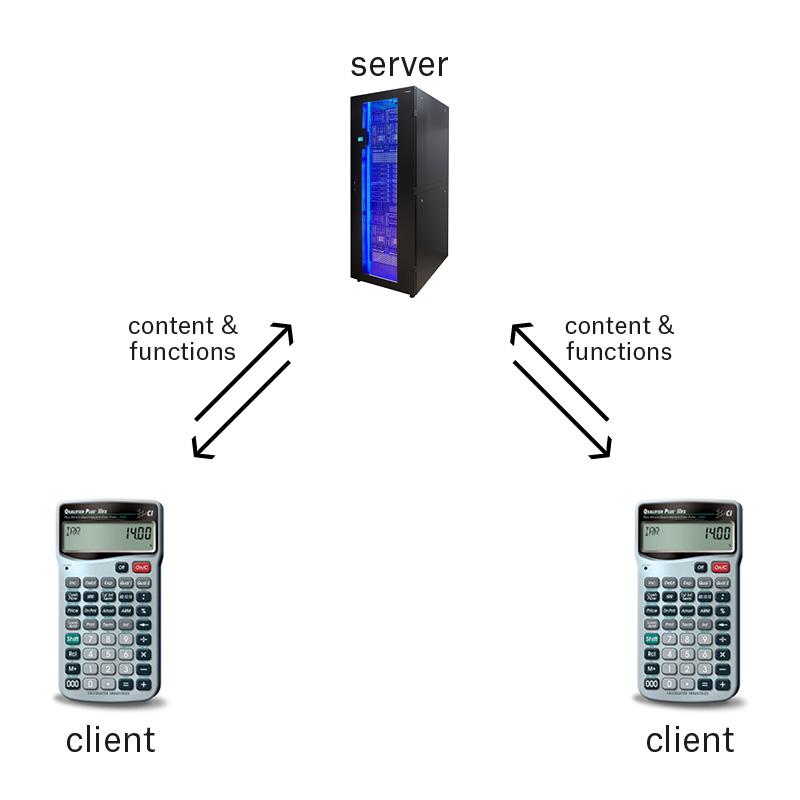
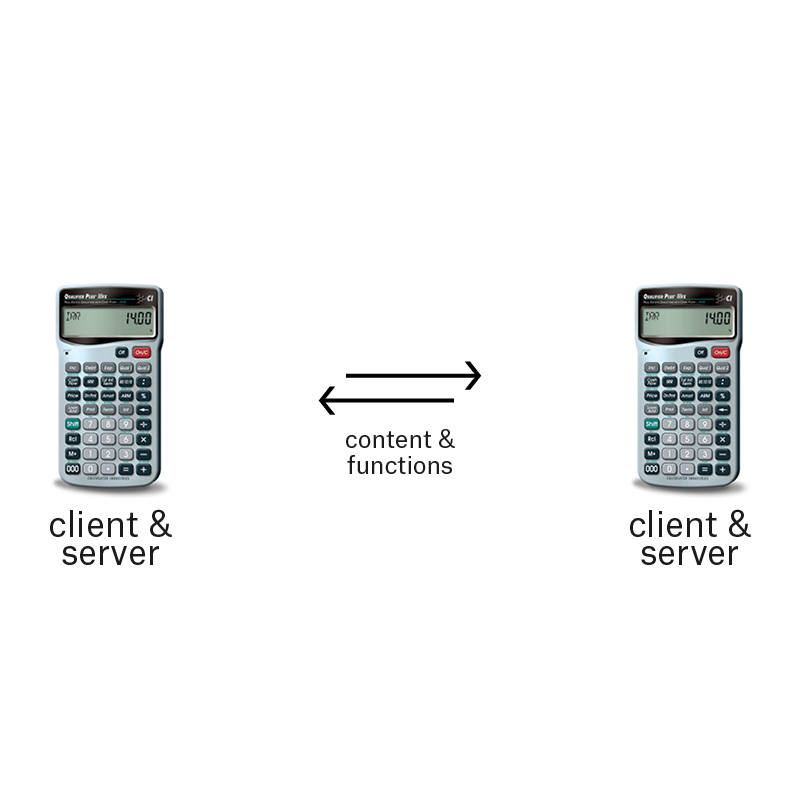
http:// | hyper:// | http:// + hyper://
We will be using the third model, where http:// and hyper:// find love.
### The Third Party Server
As mentioned, for all of this two work, we need a third-party server. This server, again, will not serve your Recycle Bin or its contents; your personal computer will. This third-party acts as a "bridge" or "portal", enabling others to pull the contents of your Recycle Bin into their computers through a traditional web-browser.
So, there are a few ways to get a server. Some use hosting packages and other's like VPS. I would recommend purchasing a [Raspberry Pi](https://www.raspberrypi.org/) and using it as a home server.
You will need to [install the Apache server software on your Raspberry Pi](https://www.raspberrypi.org/documentation/remote-access/web-server/apache.md), [configure `SSH` and `git`](https://homebrewserver.club/demystifying-ssh.html), and [forward your public IP address's `http` requests to your Raspberry Pi's private IP address](https://homebrewserver.club/fundamentals-port-forwarding.html). These are the appropriate links for this. The details are not covered in this tutorial.
After you have a third-party server set-up and can push files to it with `git`, you are ready to move on to the next step.
### Back-end Design
Create a working directory in the root folder of your website called `recycle-bin` and navigate to it. Download the contents of the [client-side-scripts](client-side-scripts) folder in this repository to that folder.
Here is a brief overview of the [`index.js`](client-side-scripts/js/recycle.js) file:
```js
const SDK = window.datSDK,
{ Hyperdrive, close } = await SDK(),
{ Buffer } = buffer,
$ = (id) => { return document.getElementById(id) },
main = $('main'),
recycleBinInfo = $("recycle-bin-info"),
infoContainer = $("info-container"),
infoIcon = $("info"),
feed = document.querySelector('.feed'),
peerStatus = feed.querySelector('#peers .count')
key = 'hyper://bad2da4907e98db3bddba22a3d1b44eb283803d47c7bcb7226a71d2b6df2b84a', // recycle bin
mainLog = []
sync(key)
async function sync(key) {
const [archive, info] = await loadMetadata(key)
const dir = await archive.readdir('/')
populateFeed(archive, info, feed, '')
listenForNetwork(archive)
}
async function loadMetadata(key) {
const archive = await Hyperdrive(key, { persist: true })
await archive.ready()
await reallyReady(archive)
const info = { title: 'Recycle Bin' }
return [archive, info]
}
function reallyReady(archive, cb) { ... }
async function populateFeed(archive, info, feed, dirpath) { ... }
function makeFeedItem(logItem) { ... }
async function makeLogItem(archive, info, path) { ... }
async function listenForNetwork(archive) { ... }
function renderMedia(ext, data) { ... }
function download(path, data) { ... }
function roundBytes(value, unit) { ... }
```
If you have ever worked with the NodeJS FS module, these functions might look familiar to you. This is because the Dat-SDK attempts to replicate local file-system manipulation logic into a sort of "peer-to-peer" networked file-system.
Next, design an interface for your Recycle Bin's "portal" in the browser. This is an overview of my `index.html` file. Notice that I am linking `dat-sdk-bundle.js` and `index.js`.
```html
<!DOCTYPE html>
<html>
<head>
<meta http-equiv="Content-Type" content="text/html; charset=utf-8"/>
<meta content="width=device-width, initial-scale=1" name="viewport" />
<title>Recycle Bin</title>
<script src="js/dat-sdk-bundle.js"></script>
<script src="js/marked.min.js"></script>
<script src="js/buffer.js"></script>
<script src="js/moment.js"></script>
<script src="js/highlight.pack.js"></script>
<link rel="styles/stylesheet" href="github.css">
<style>
{ ... }
</style>
</head>
<body>
<div id="main">
<div id="recycle-bin-info" class="hidden">
<div id="info-container"></div>
</div>
<div class="feed">
<div class="header">
<div id="info"><img src="src/info.svg"/></div>
<div class="logo"><img src="src/recyclebin.svg"/></div>
<div id="peers">
<img src="src/insta-direct.svg" />
<div class="count">1</div>
</div>
</div>
<div class="body"><div class="end">wait</div></div>
</div>
<div id="recyclebinicon">
<img id="infoIcon" src='src/recyclebin.png' />
</div>
</div>
<script src="js/index.js"></script>
</body>
</html>
```
If you push this folder onto your website, anyone should be able to access the contents of your Recycle Bin at `<your-website>.com/RecycleBin`
<!--  -->
---
## Conclusion
That's it! You've successfully served your trash to the public domain and created a cute web-portal for it. You can now start deleting consciously.
If you are stuck somewhere, find a mistake, have any questions or just want to share your Recycle Bin's key, don't hesitate to write me: [bonjour@moubarak.eu](mailto:bonjour@moubarak.eu).
### Credits
Many thanks to Catelijne van Middelkoop for her continuous support, [Anja Groten](https://onions.io/) for her theoretical references and guidance through research, Pawel Pokutycki for his feedback, [Rick Vermuelen](http://viarick.com/) for our chats about Mail Art and [RangerMauve](https://ranger.mauve.moe/) for their amazing work maintaining the Dat-SDK and quick responses to my urgent emails about trash.
### Theoretical Footing
**To Save Everything, Click Here: The Folly of Technological Solutionism**
_Evgeny Morozov (2013)_
**The Techno-Galactic Guide to Software Observation**
_Constant VZW (2017)_
**Program or Be Programmed: Ten Commands for a Digital Age**
_Douglas Rushkoff (2010)_
**The Costs of Connection: How Data Is Colonizing Human Life and Appropriating It for Capitalism**
_Nick Couldry & Ulises Ali Mejias (2019)_
**Off The Network: Disrupting the Digital World**
_Ulises Ali Mejias (2013)_
**Protocol: How Control Exists After Decentralisation**
_Alexander R. Galloway (2004)_
### Author
[Karl Moubarak](https://moubarak.eu)
### License
[Creative Commons Attribution Share Alike 4.0 International](/LICENSE)